The Jira Service Management virtual service agent
Virtual service agent 101
There are a few steps to get your virtual service agent up and running. Depending on your goals, you can keep it simple and get started automating requests within minutes, or spend some time customizing your setup and optimizing further as you go.
Default request types
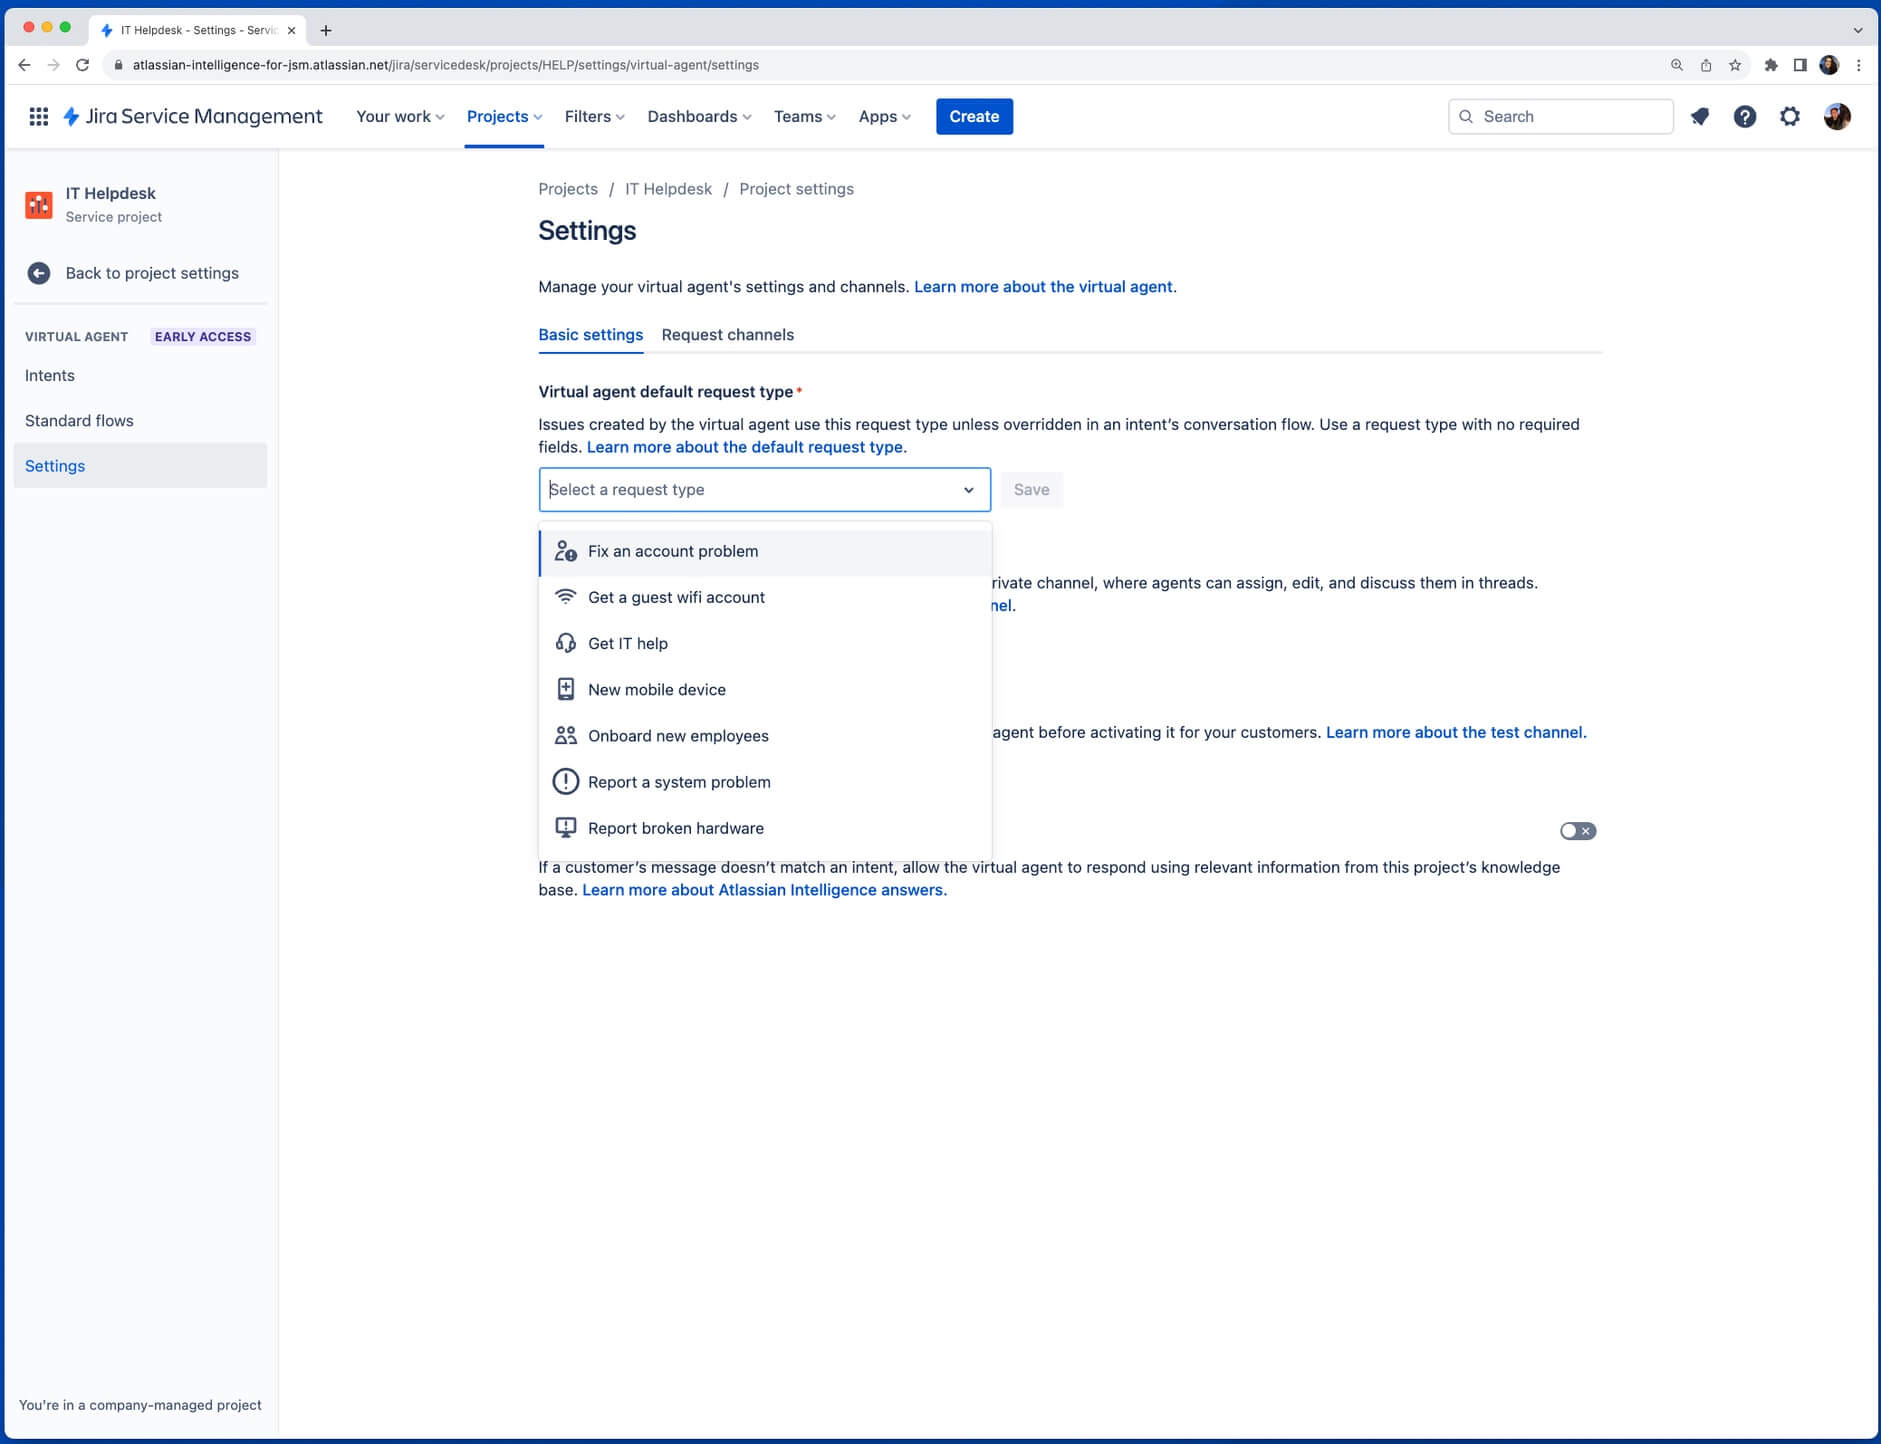
Regardless of how you plan to use the virtual service agent, your first step will be to navigate to Project settings, then Virtual service agent, and start by selecting your default request type. When the virtual service agent is unable to resolve a request on your behalf, it will automatically create issues in Jira Service Management using a pre-selected default request type (don’t worry, you’ll have the option to override that with a specific request type later on if needed). Please note, your default request type cannot have any required fields.
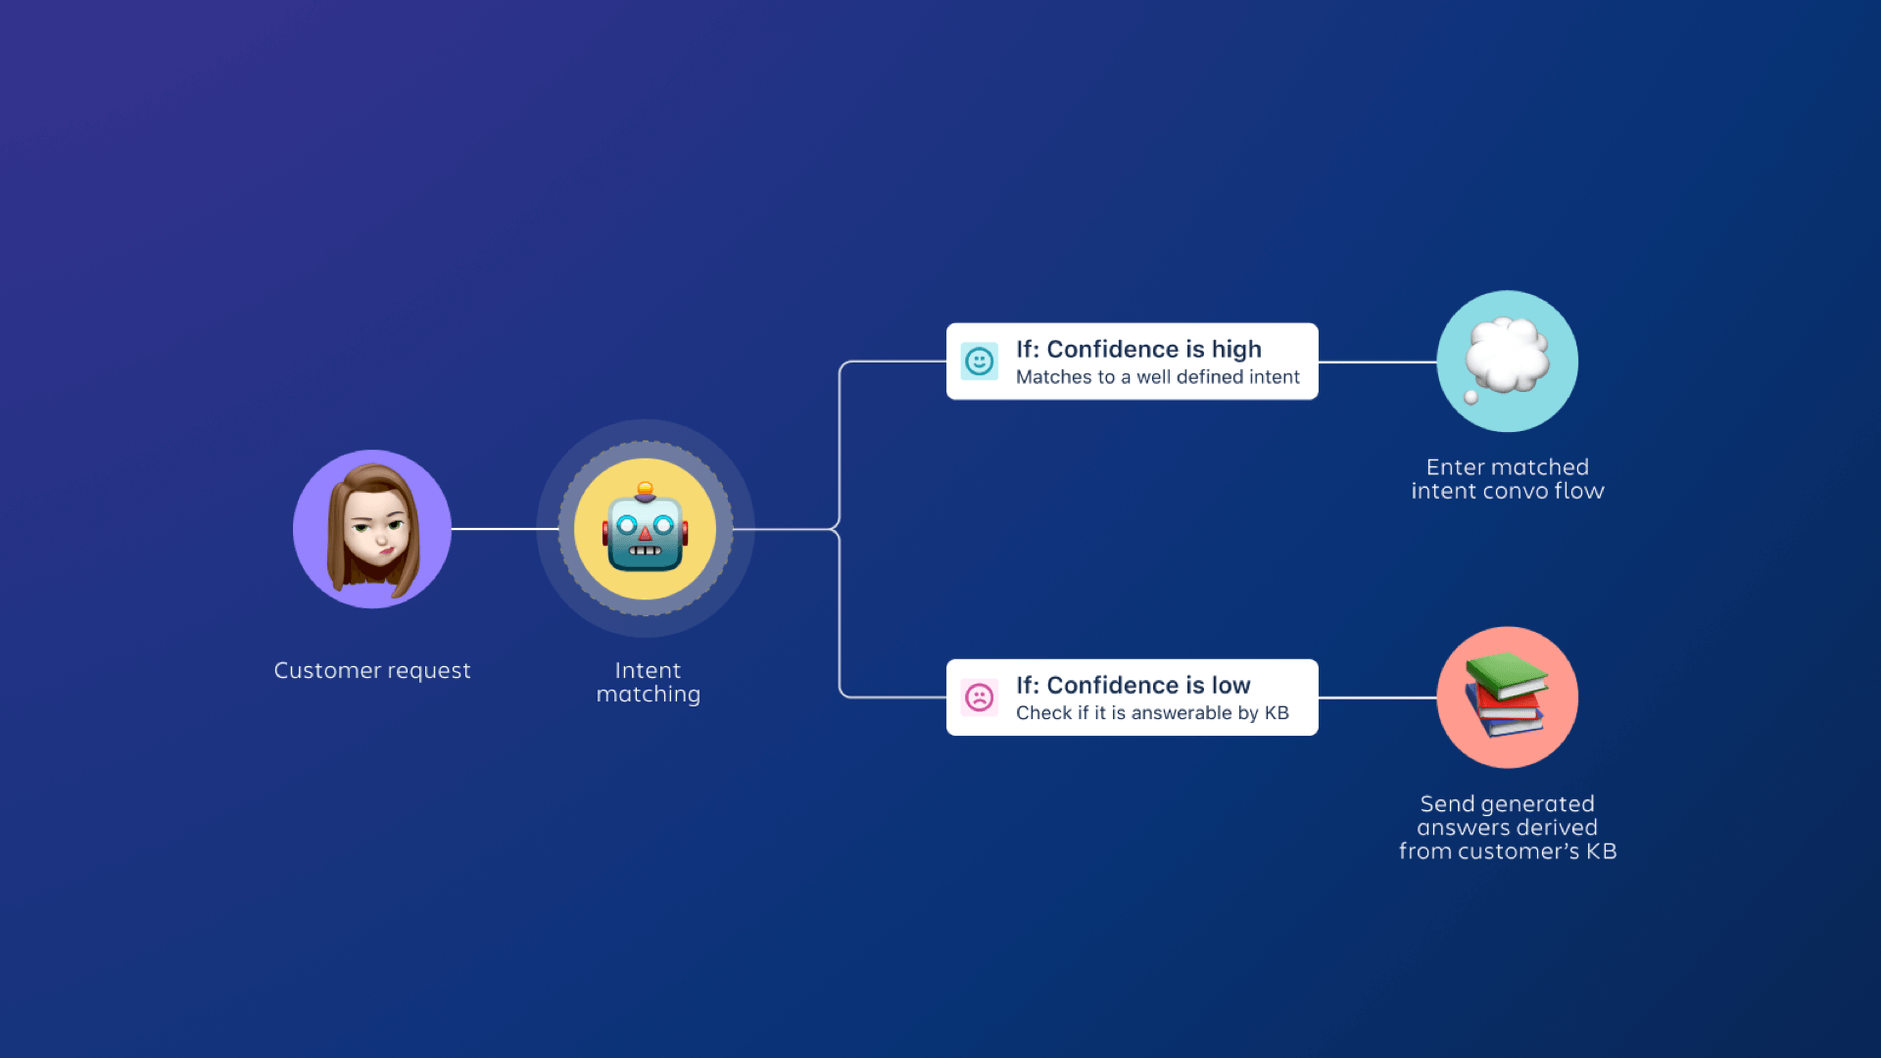
From there, there are two primary ways to configure the Jira Service Management virtual service agent depending on the type and complexity of requests you’re looking to automate: intent flows and Atlassian Intelligence answers (AI answers). You can use one or both of these to help deflect tickets and deliver fast support to your customers.
1. Intent flows
Pre-defined conversation flows dependent on help-seeker responses to the virtual service agent.
Great for questions that:
- Require guided work/troubleshooting
- Require information collection and triaging
- Require an automated action via web request
Examples: Software access requests, reporting an incident, new hardware, procurement requests, onboarding workflows
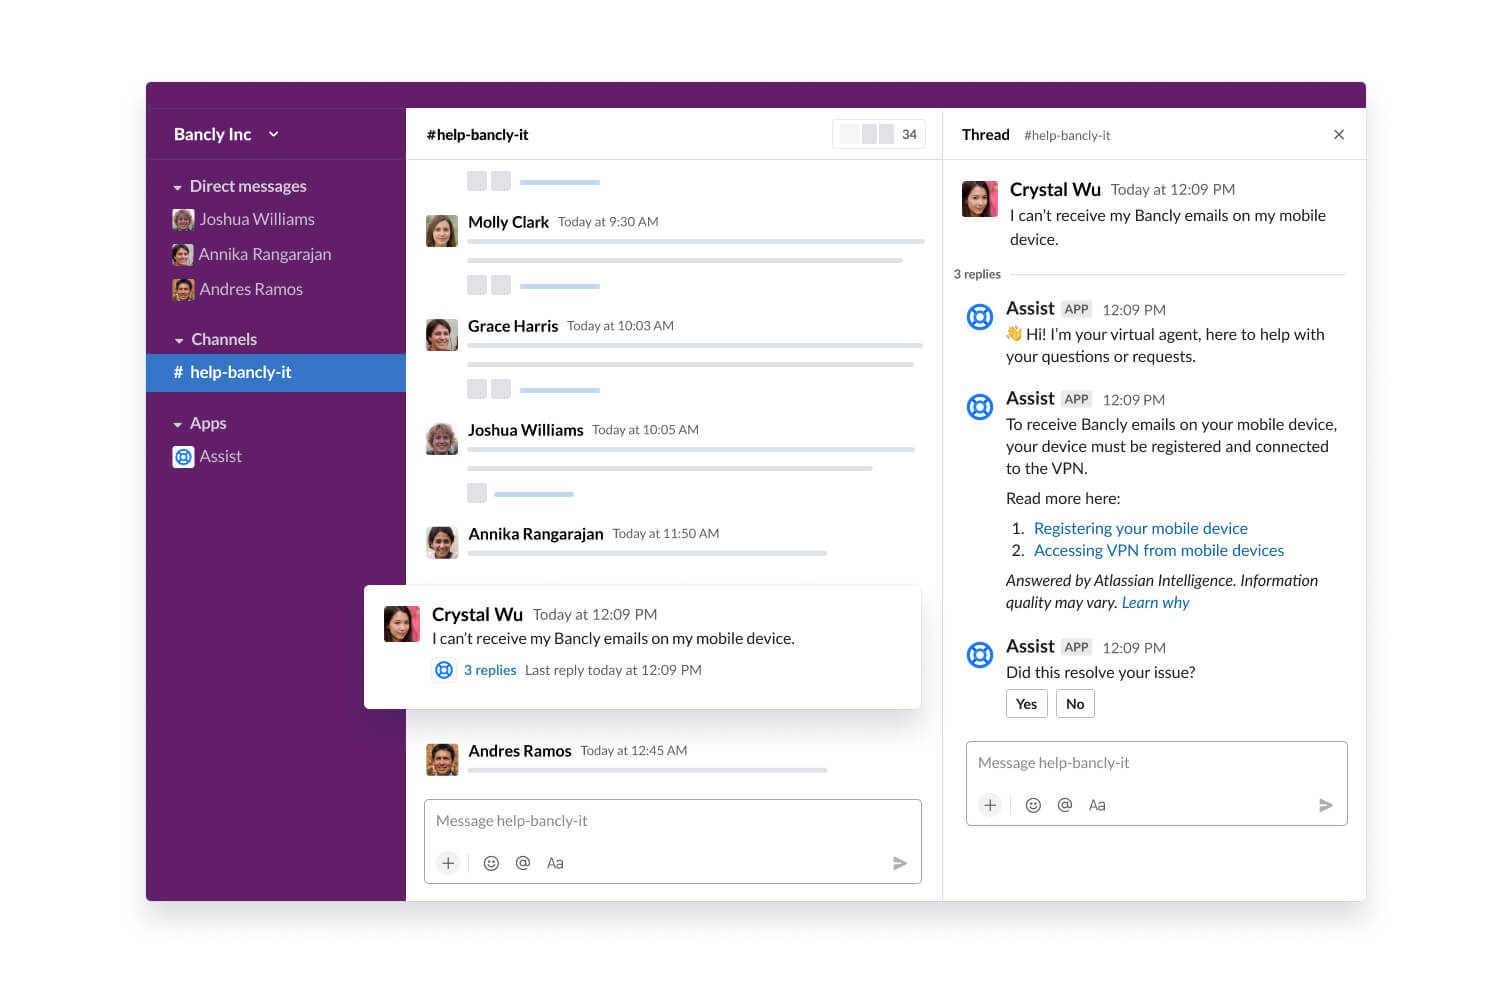
2. Atlassian Intelligence answers
Uses generative artificial intelligence to search across your linked knowledge base spaces and answer your customer questions.
Great for questions that:
- Can be resolved by providing information or instructions
- Are covered in (or can be easily added to) your existing knowledge base articles
- Don’t usually need to be escalated to a human agent
Examples: Company holidays, WiFi access, BYOD setup, HR policies, password reset instructions
Setting up intent flows
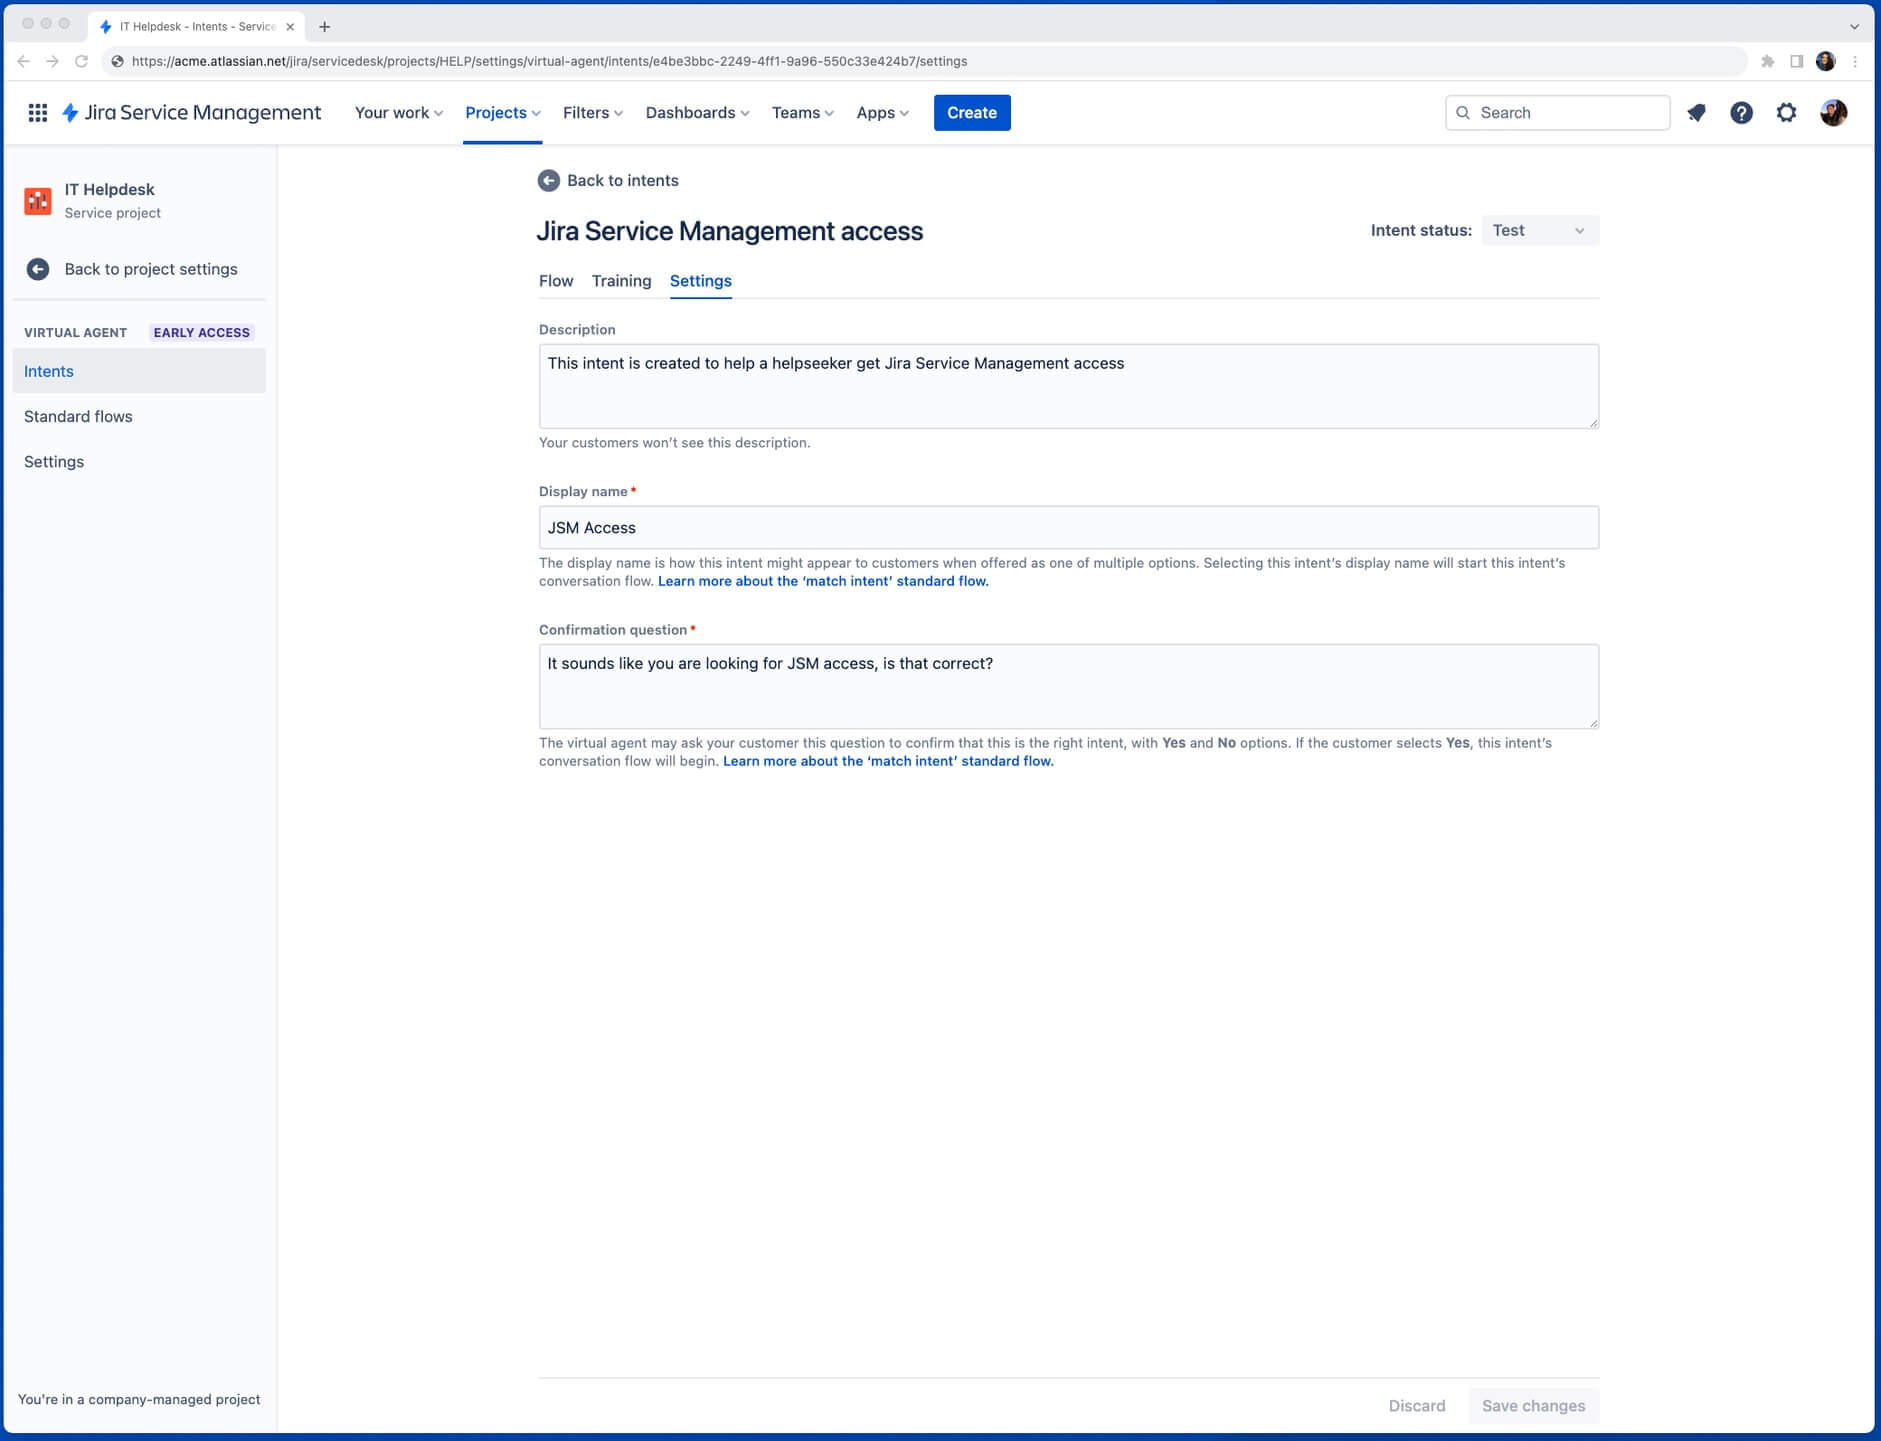
Intents in the Jira Service Management virtual service agent are how you represent a specific problem, question, or request that your virtual service agent can help resolve for your customers. These are comprised of three key elements:
-
Basic settings
-
Training phrases
-
Flows
This includes:
- Display name (this is how it might appear to customers when offered as one of multiple options)
- Internal description
- Confirmation question
Training phrases help your virtual service agent match customer messages to this intent. You need a minimum of three per intent, but for best results, enter a wide variety of phrases used by your customers when asking for help with the subject of this intent

When the virtual service agent detects an intent in a customer’s message, it asks them to confirm that the intent detected is correct. Once confirmed, the virtual service agent starts the designated conversation flow for that intent.
Example intent
Let’s say a large number of your customers need help resetting their passwords for various software applications every day. You have instructions documented for each software program, but they’re hard to find, so customers frequently come to your chat platform to ask your support agents for help. This means that your agents spend a lot of their time repeatedly sending the same links to your customers.
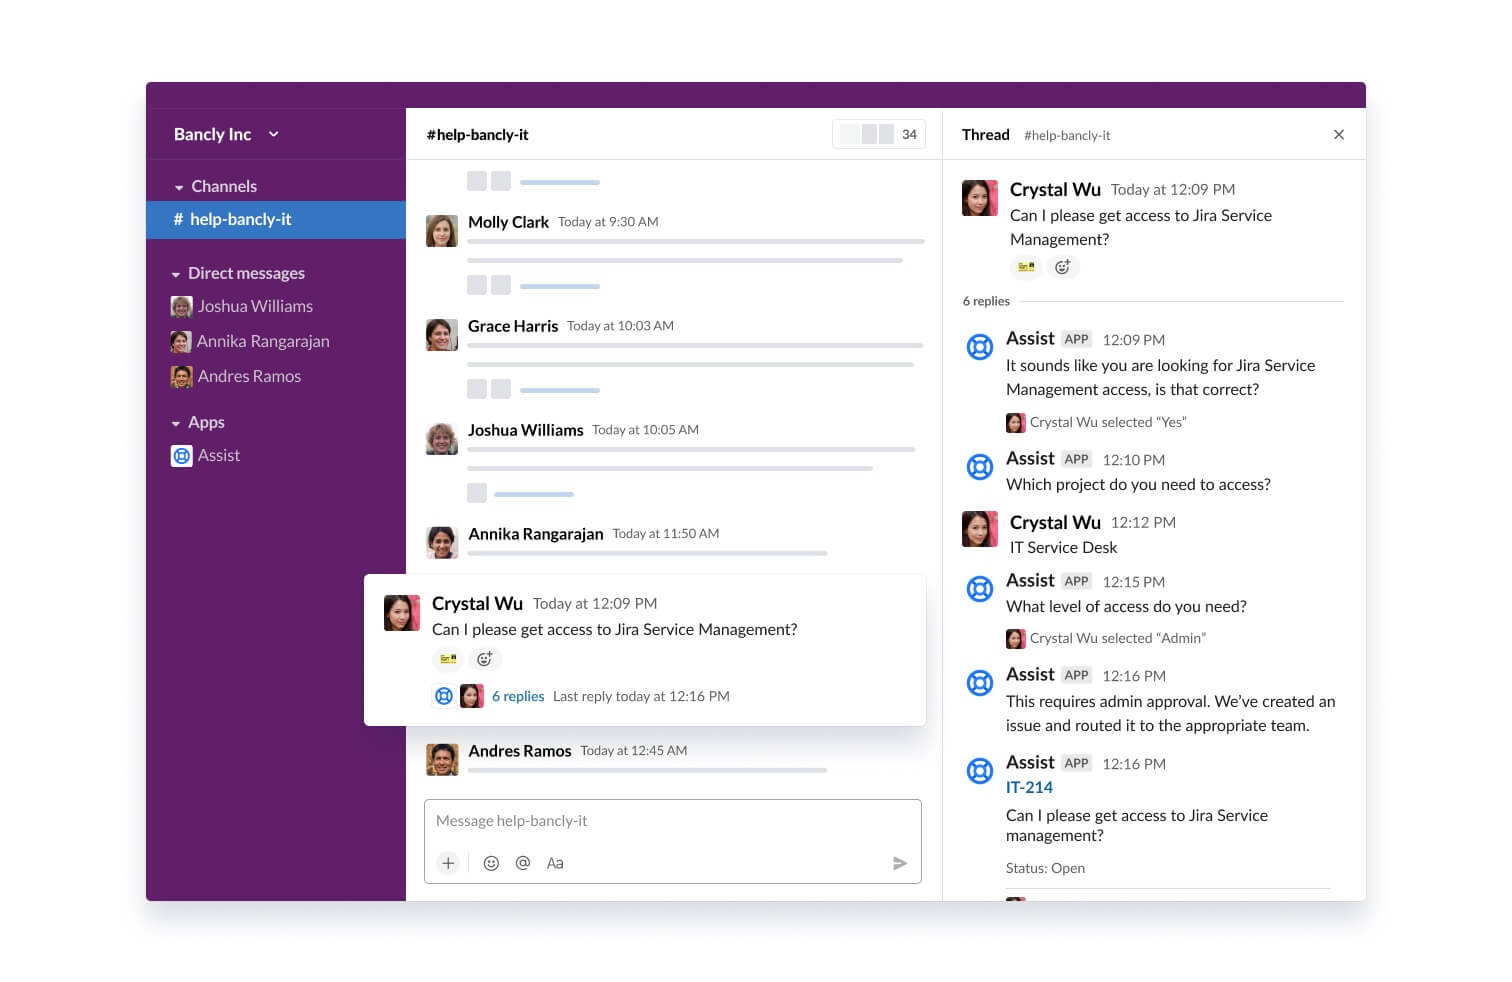
In this scenario, you could create an intent with the display name Password reset, and train your virtual service agent to recognize when customers are asking for help with resetting their password. Then you could configure the Password reset conversation flow so that the virtual service agent:
- asks the customer which software program they want to reset their password for
- sends the customer a link to the relevant instructions
- asks whether the instructions helped them, and if not, creates an issue in Jira Service Management for a human agent to work on
How to create an intent
Intents can be created manually if your team already has an idea of the common issues you’d like to automate, but if not, the virtual service agent makes it easy to discover and build intents with templates. Intent templates give you a list of training phrases and some basic settings to start with, and can be edited at any time. There are two types you can choose from:
- From your data: Templates are automatically created using recent issue data from your project. These are recommended based on expected coverage and are trained using real language from your customers.
- Regular template: Out-of-the-box templates are created based on common intents and issue categories used by teams like yours. (E.g. common HR questions, common IT requests, etc.)
To get started building an intent:
- From the navigation on the left, select Project settings, then Virtual service agent.
- Select Intents, and then Create intent.
- To use a template, select Browse templates. Hover over a template to see its details. Select a template to use it.
- Enter (or edit) the Name, Description, or Display name.
- Enter (or edit) three Training phrases.
- Select Create.
Pro tip: Creating effective training phrases
- Use words and phrases most commonly used by your actual customers. Customers may ask for the same thing in very different ways — capture as many of these different ways of asking as you can! Read through past issues, and copy and paste the initial phrases your customers use when asking for help with the intent's main purpose.
- Add as many unique training phrases as you can. Avoid repetition, but add as many as you can to give the virtual service agent as much data as possible to train with. We recommend around 20 training phrases to start with, but you can add up to 100.
- Review and edit your training phrases as needed. As you watch the virtual service agent’s performance, you may want to come back to existing intents and edit your training phrases to make your virtual service agent’s intent recognition even more effective over time.
Build a conversation flow
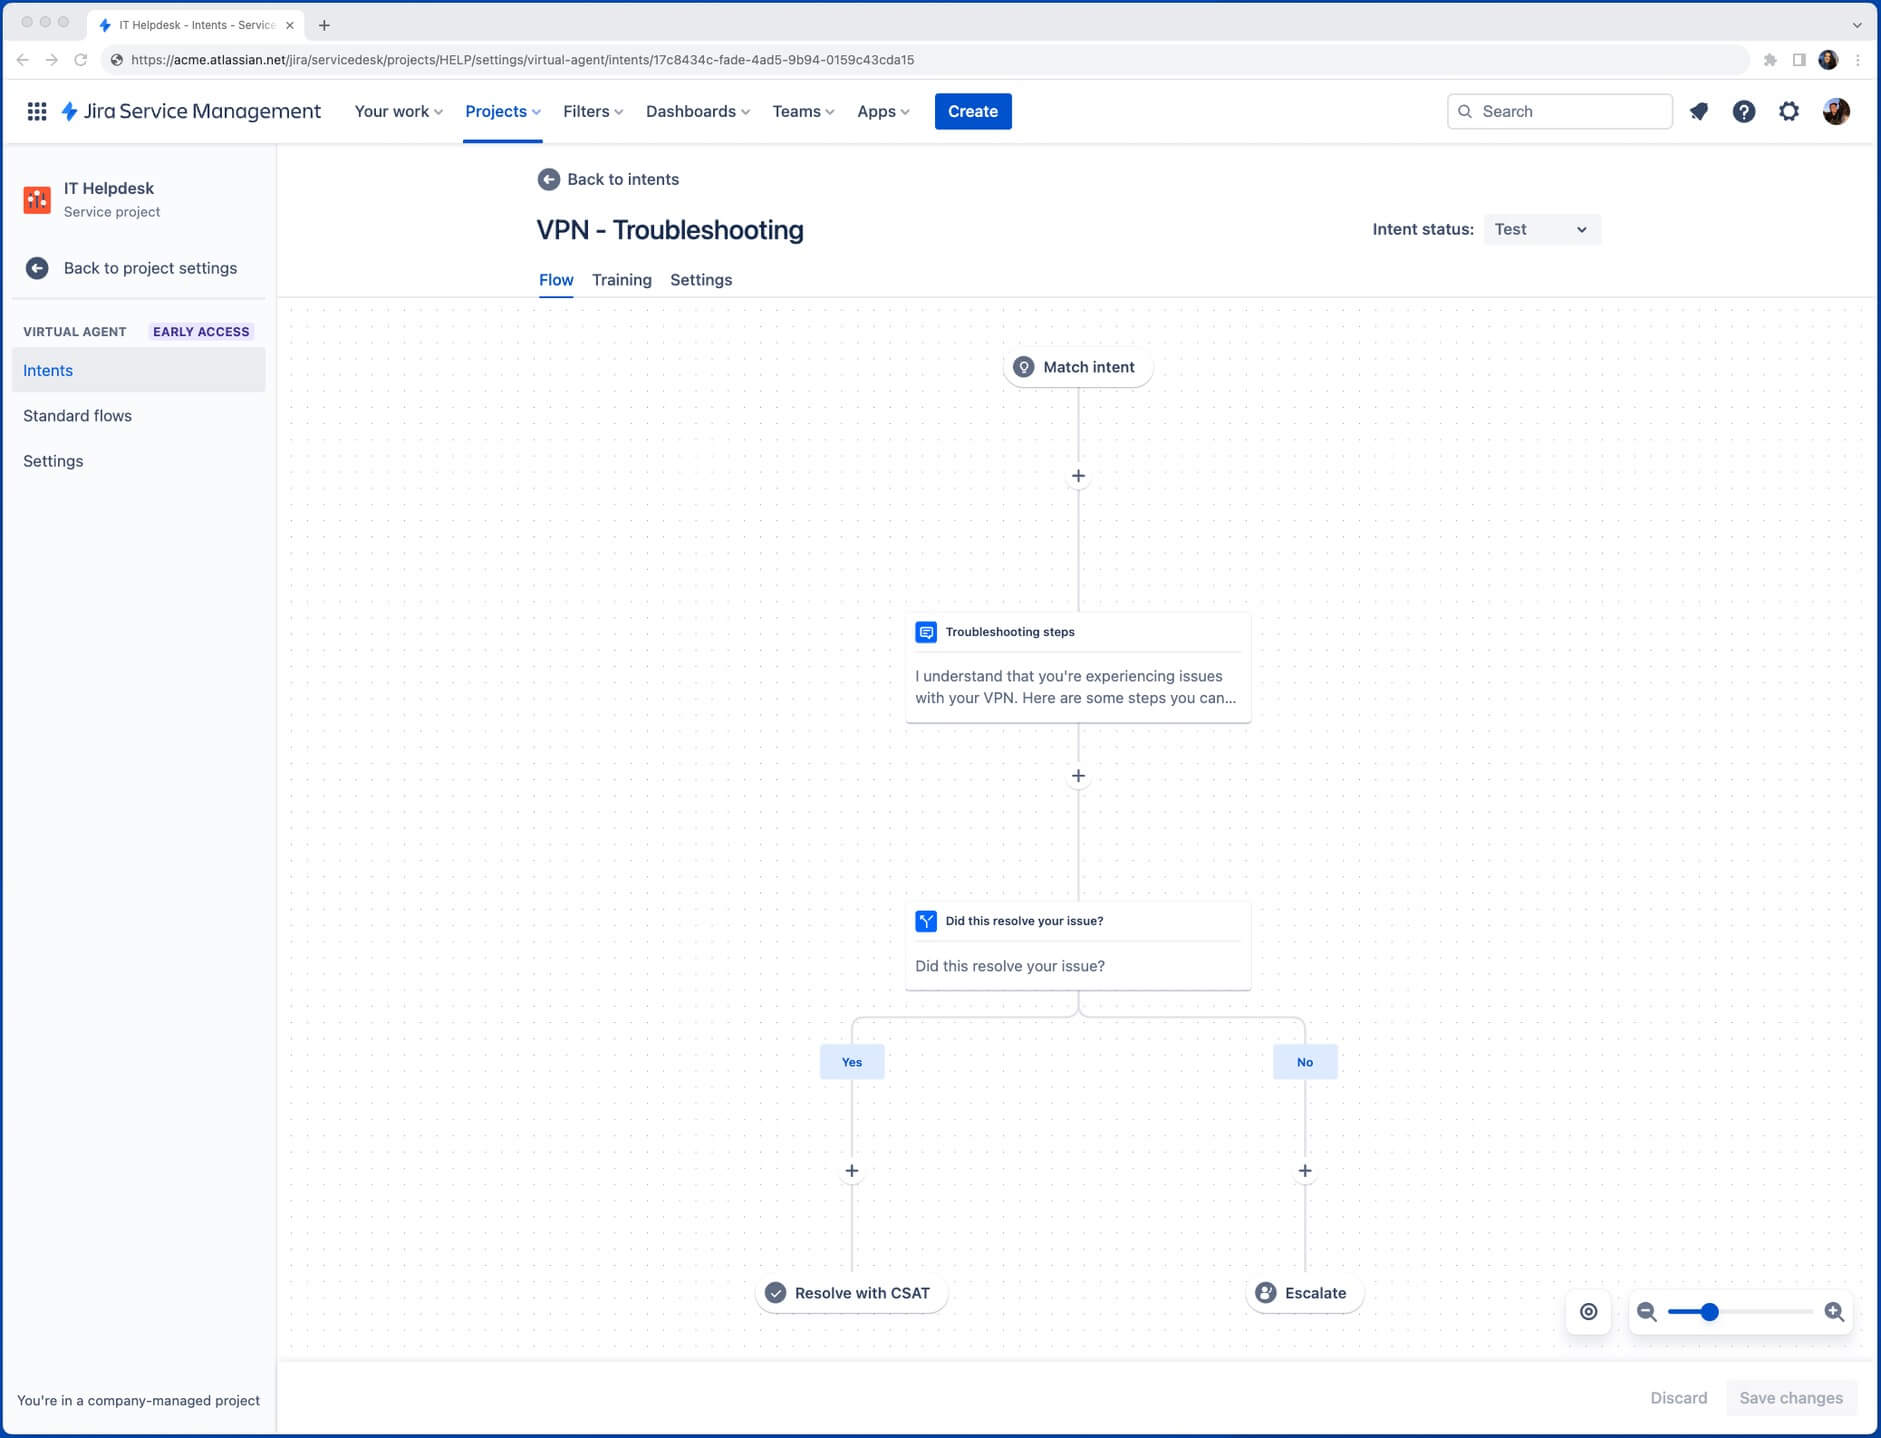
An intent flow behaves a lot like a normal conversation between two people: The virtual service agent says something, waits for the customer to respond, then replies accordingly. A well-designed flow anticipates the things your customers might say and makes sure they get the help they need.
Flows are made up of a series of steps and branches, which visually represent each individual part of a conversation flow and the various paths they can take depending on how the customer responds to the virtual service agent. Each branch can serve a different purpose or move the customer to a specific resolution.
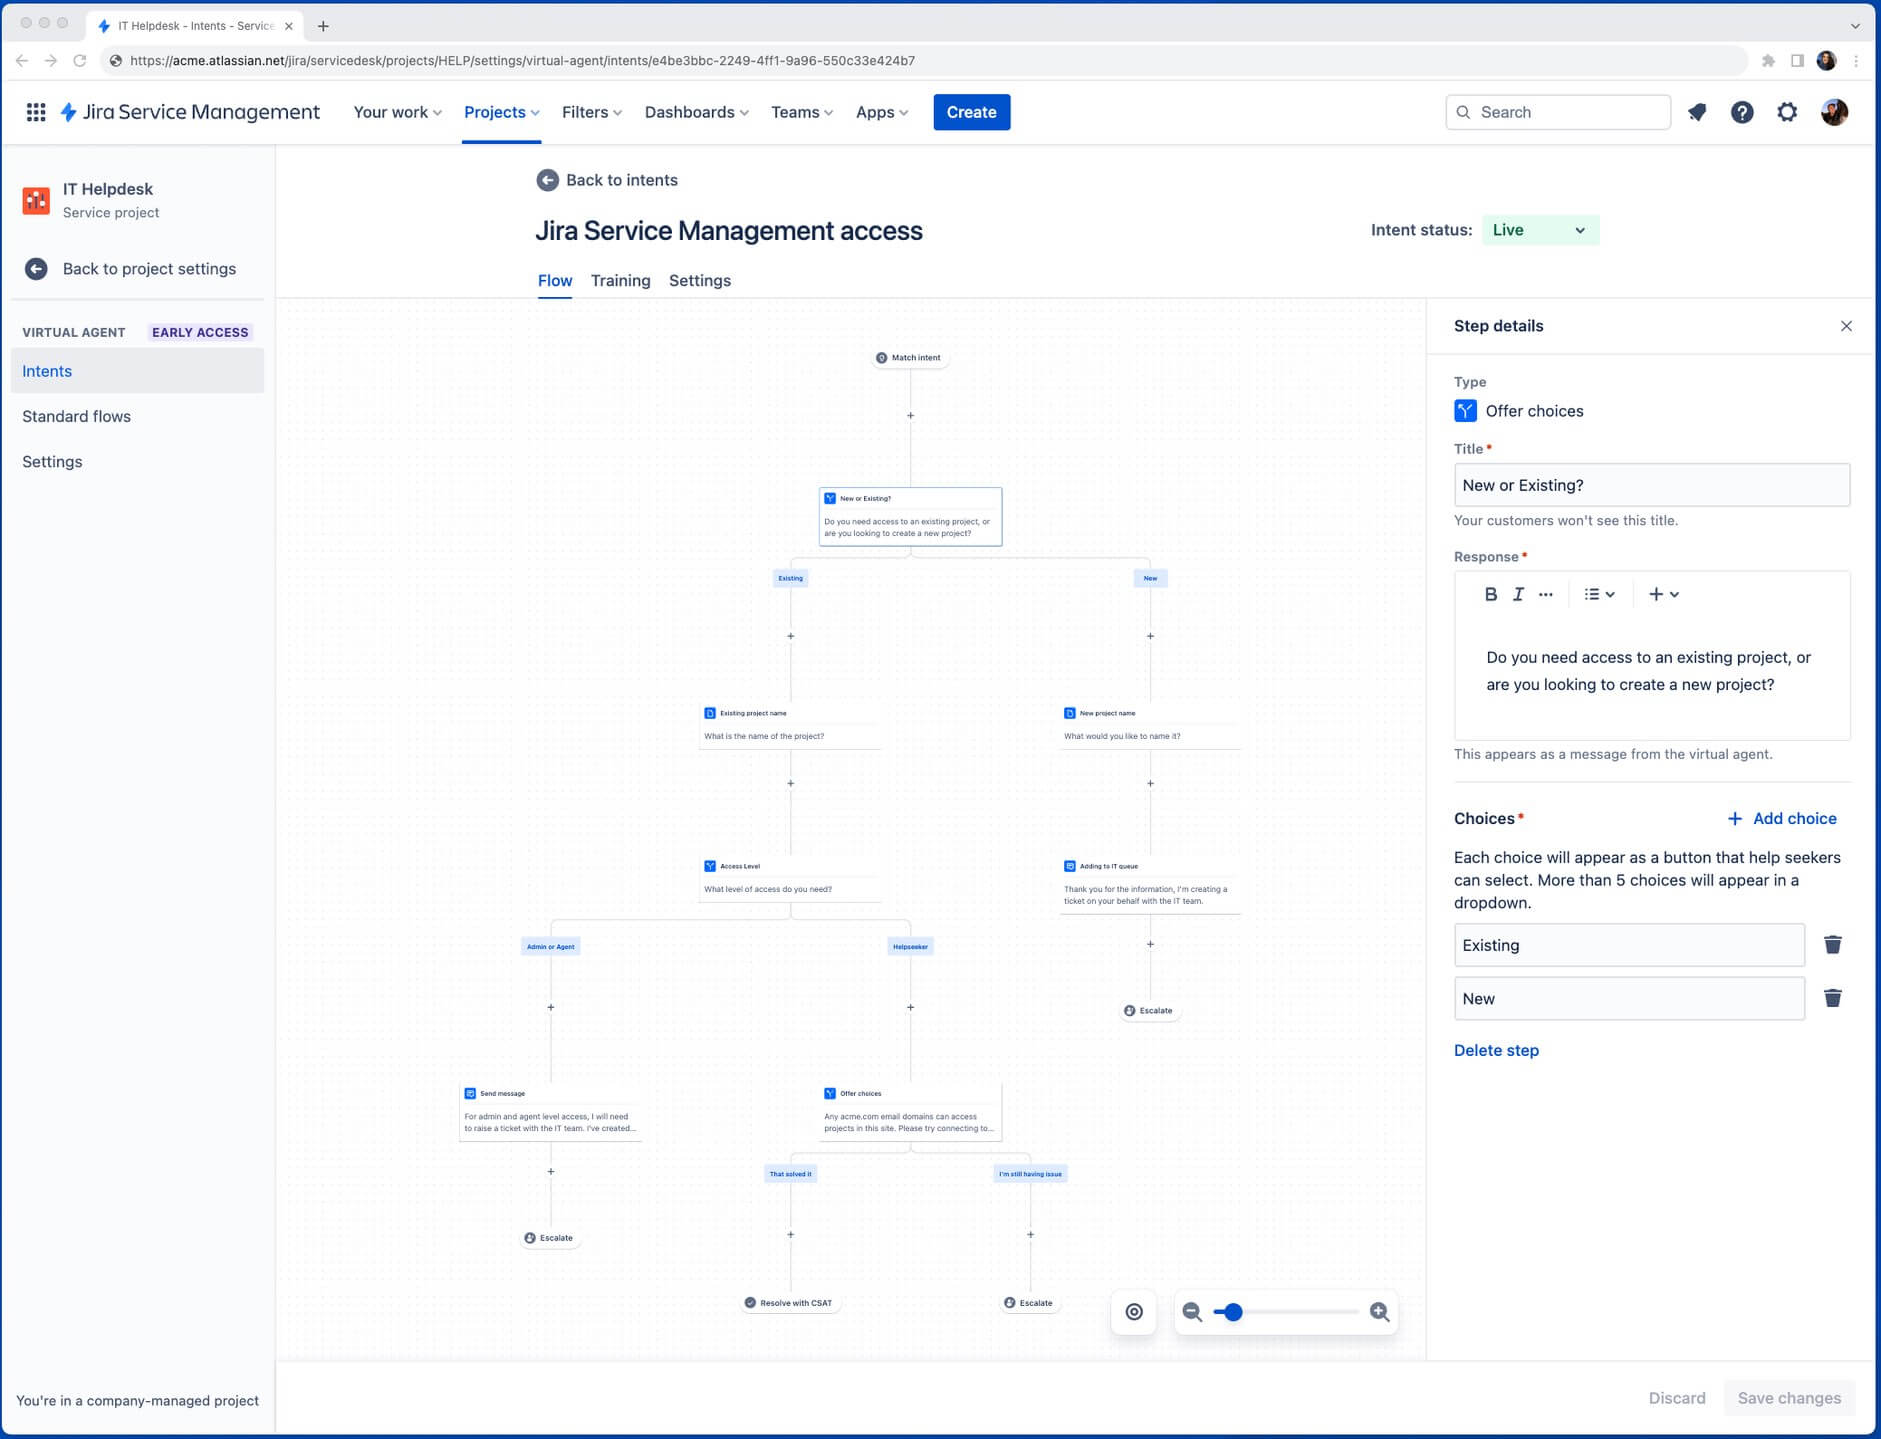
There are five step options to choose from when building a flow:
- Offer choices: Offer the customer up to 10 pre-set options to choose from.
- Send message: Sends a message from the virtual service agent to the customer – these messages can include some formatting and hyperlinks.
- Ask for information: Use this step when you’d like to collect information from customers to use as placeholders in a web request step, or to fill in a Jira field if an issue is created later in the conversation.
- Change request type/fields: Override the virtual service agent default request type for any issues created after a specific point in a conversation flow.
- Web request: Use this step when you want to send an HTTP request to a URL, and choose a conversation branch based on the response. (Hint: This is how you can automate actions like granting software access.)
Pro Tip: Your virtual service agent comes with standard flows out-of-the-box
Standard flows are reusable conversation flows that the virtual service agent uses to complete basic, repetitive tasks, like greeting the customer, creating issues, or asking for clarification if something’s unclear. There are five standard flows that come out-of-the-box with your virtual service agent:
- Greet: Posts a short, customizable greeting in response to a customer’s first message.
- Match intent: Quickly gets the customer into the correct intent’s conversation flow by asking a confirmation question, asking them to rephrase the question, presenting multiple intent options, or suggesting an answer from a knowledge base article.
- Resolve with CSAT: Ends a conversation when a customer indicates that their request has been resolved by the virtual service agent by asking for a customer satisfaction (CSAT) score.
- Auto-close: Triggers when the customer is matched with an intent or AI answer, but there's been no activity in the thread for five minutes; prompts the customer to ensure they got the help they needed.
- Escalate: This lets the customer know that a request has been raised on their behalf and automatically creates an issue in Jira Service Management using the virtual service agent default request type (unless it’s overridden during the conversation flow).
To create a new conversation flow:
- Select the intent you want to edit or create a conversation flow for and select Flow.
- Add, edit, or delete steps to build your conversation flow:
- To add a new step, select Add () in the place you want the step to appear, select the type of step you want to use, and then edit its details in the panel that appears on the right.
- To edit an existing step, select the step you want to edit, and then edit it in the panel that appears on the right.
- To delete a step, select the step you want to delete, then select Delete step at the bottom of the panel that appears on the right. If you delete a step that breaks off into multiple branches, only the branch on the left-hand side is retained.
Pro tip: Writing effective messages for your virtual service agent
Well-written messages in your conversation flow can make a big difference in how your customers feel about their experience using the virtual service agent. Here are a few ways to ensure the best help-seeker experience:
- Keep messages short. Your customers might be in a hurry, so adding too many pleasantries or unnecessary details could add frustration. Only include what they absolutely need to know.
- Be considerate, friendly, and neutral. While it’s tempting to have fun with the virtual service agent, your customers may be coming to your channel for help with something urgent, sensitive, or potentially distressing. They also might be angry or frustrated if something isn’t working. A virtual service agent that talks to them as if everything is perfect might make their mood or situation worse.
- Offer clear, helpful choices. This may seem obvious, but when adding an offer choices step, try to account for as many possible options customers might need. In many cases, it’s helpful to also include a choice that says “something else” (followed by more clarifying questions), or even raise a request (immediately followed by the escalate standard flow). These two additional choices give your customers a way to indicate they need something that isn’t covered in the choices you’ve offered or that they want to bypass the virtual service agent and get help from one of your agents instead.
Once you’ve created your intent and finished building its conversation flow, it’ll automatically be active in your test channel. We recommend going to your test channel and testing your intent before activating it for your customers in a request channel.
Setting up AI Answers
If you’ve already got a knowledge base, setting up AI answers for the virtual service agent is a breeze – there are just a few quick steps you’ll need to take before you use it.
Connect your self-service knowledge base
First, you’ll need to ensure that you have a knowledge base linked to your project, either through Confluence or Jira Service Management’s native knowledge base. You can build out your knowledge base directly from Jira Service Management, or integrate existing FAQs and docs you already have in Confluence.

Pro tip: Double check your knowledge base permissions settings
Your linked knowledge base space needs to be set to All logged-in users under Who can view.
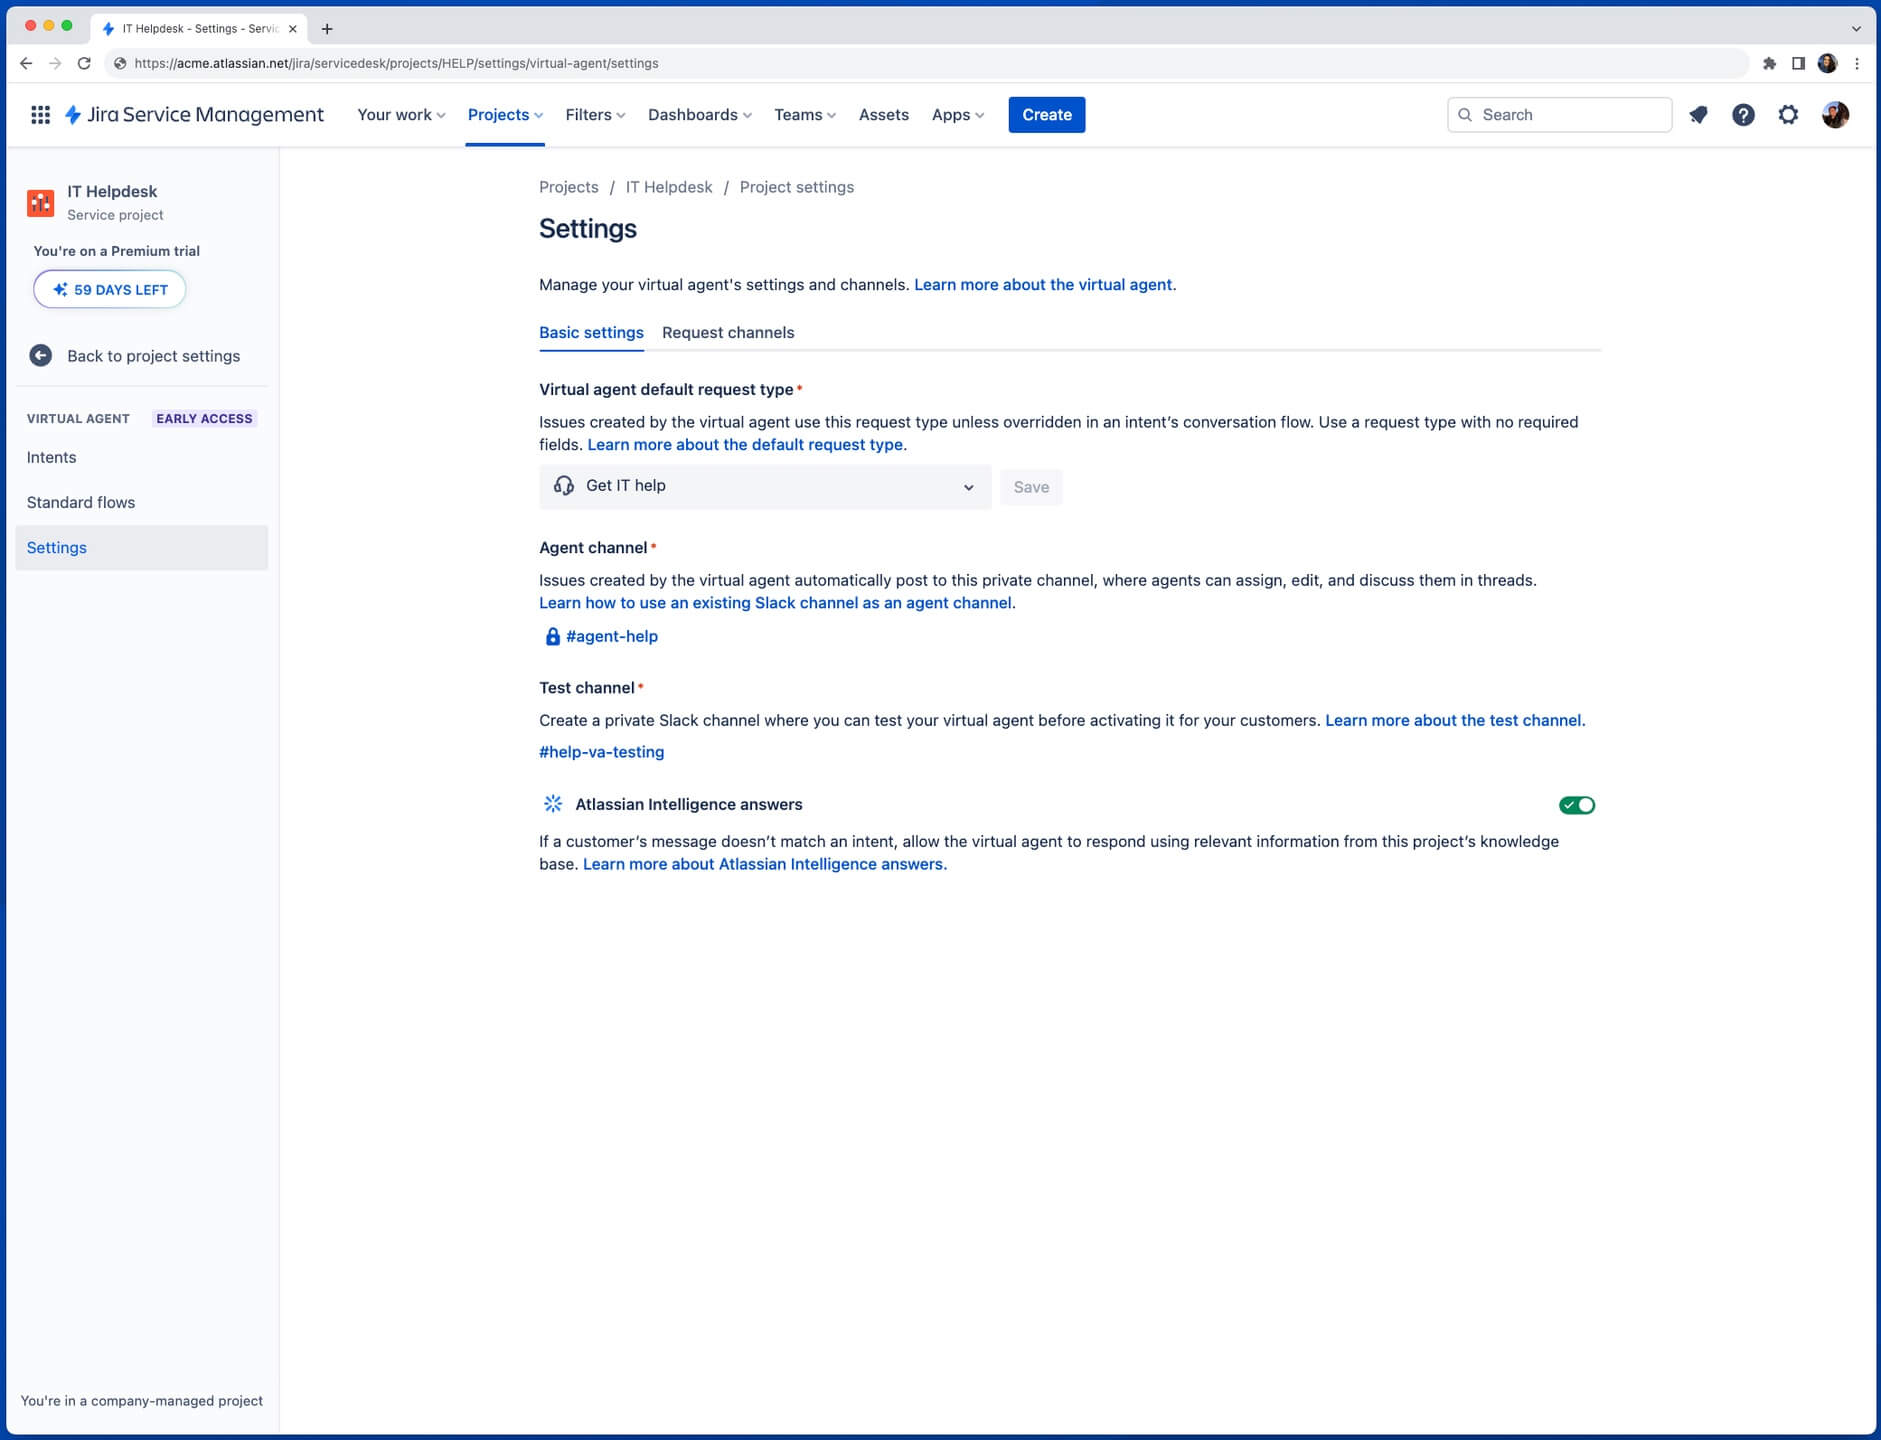
Activate Atlassian Intelligence answers in the virtual service agent
Once your knowledge base is connected ready to go, it’s time to activate AI answers in the virtual service agent settings:
- From the navigation on the left, select Project settings, then Virtual service agent.
- Select Settings, and then Basic settings if not already selected.
- Turn the toggle on next to Atlassian Intelligence answers, and then select Activate.
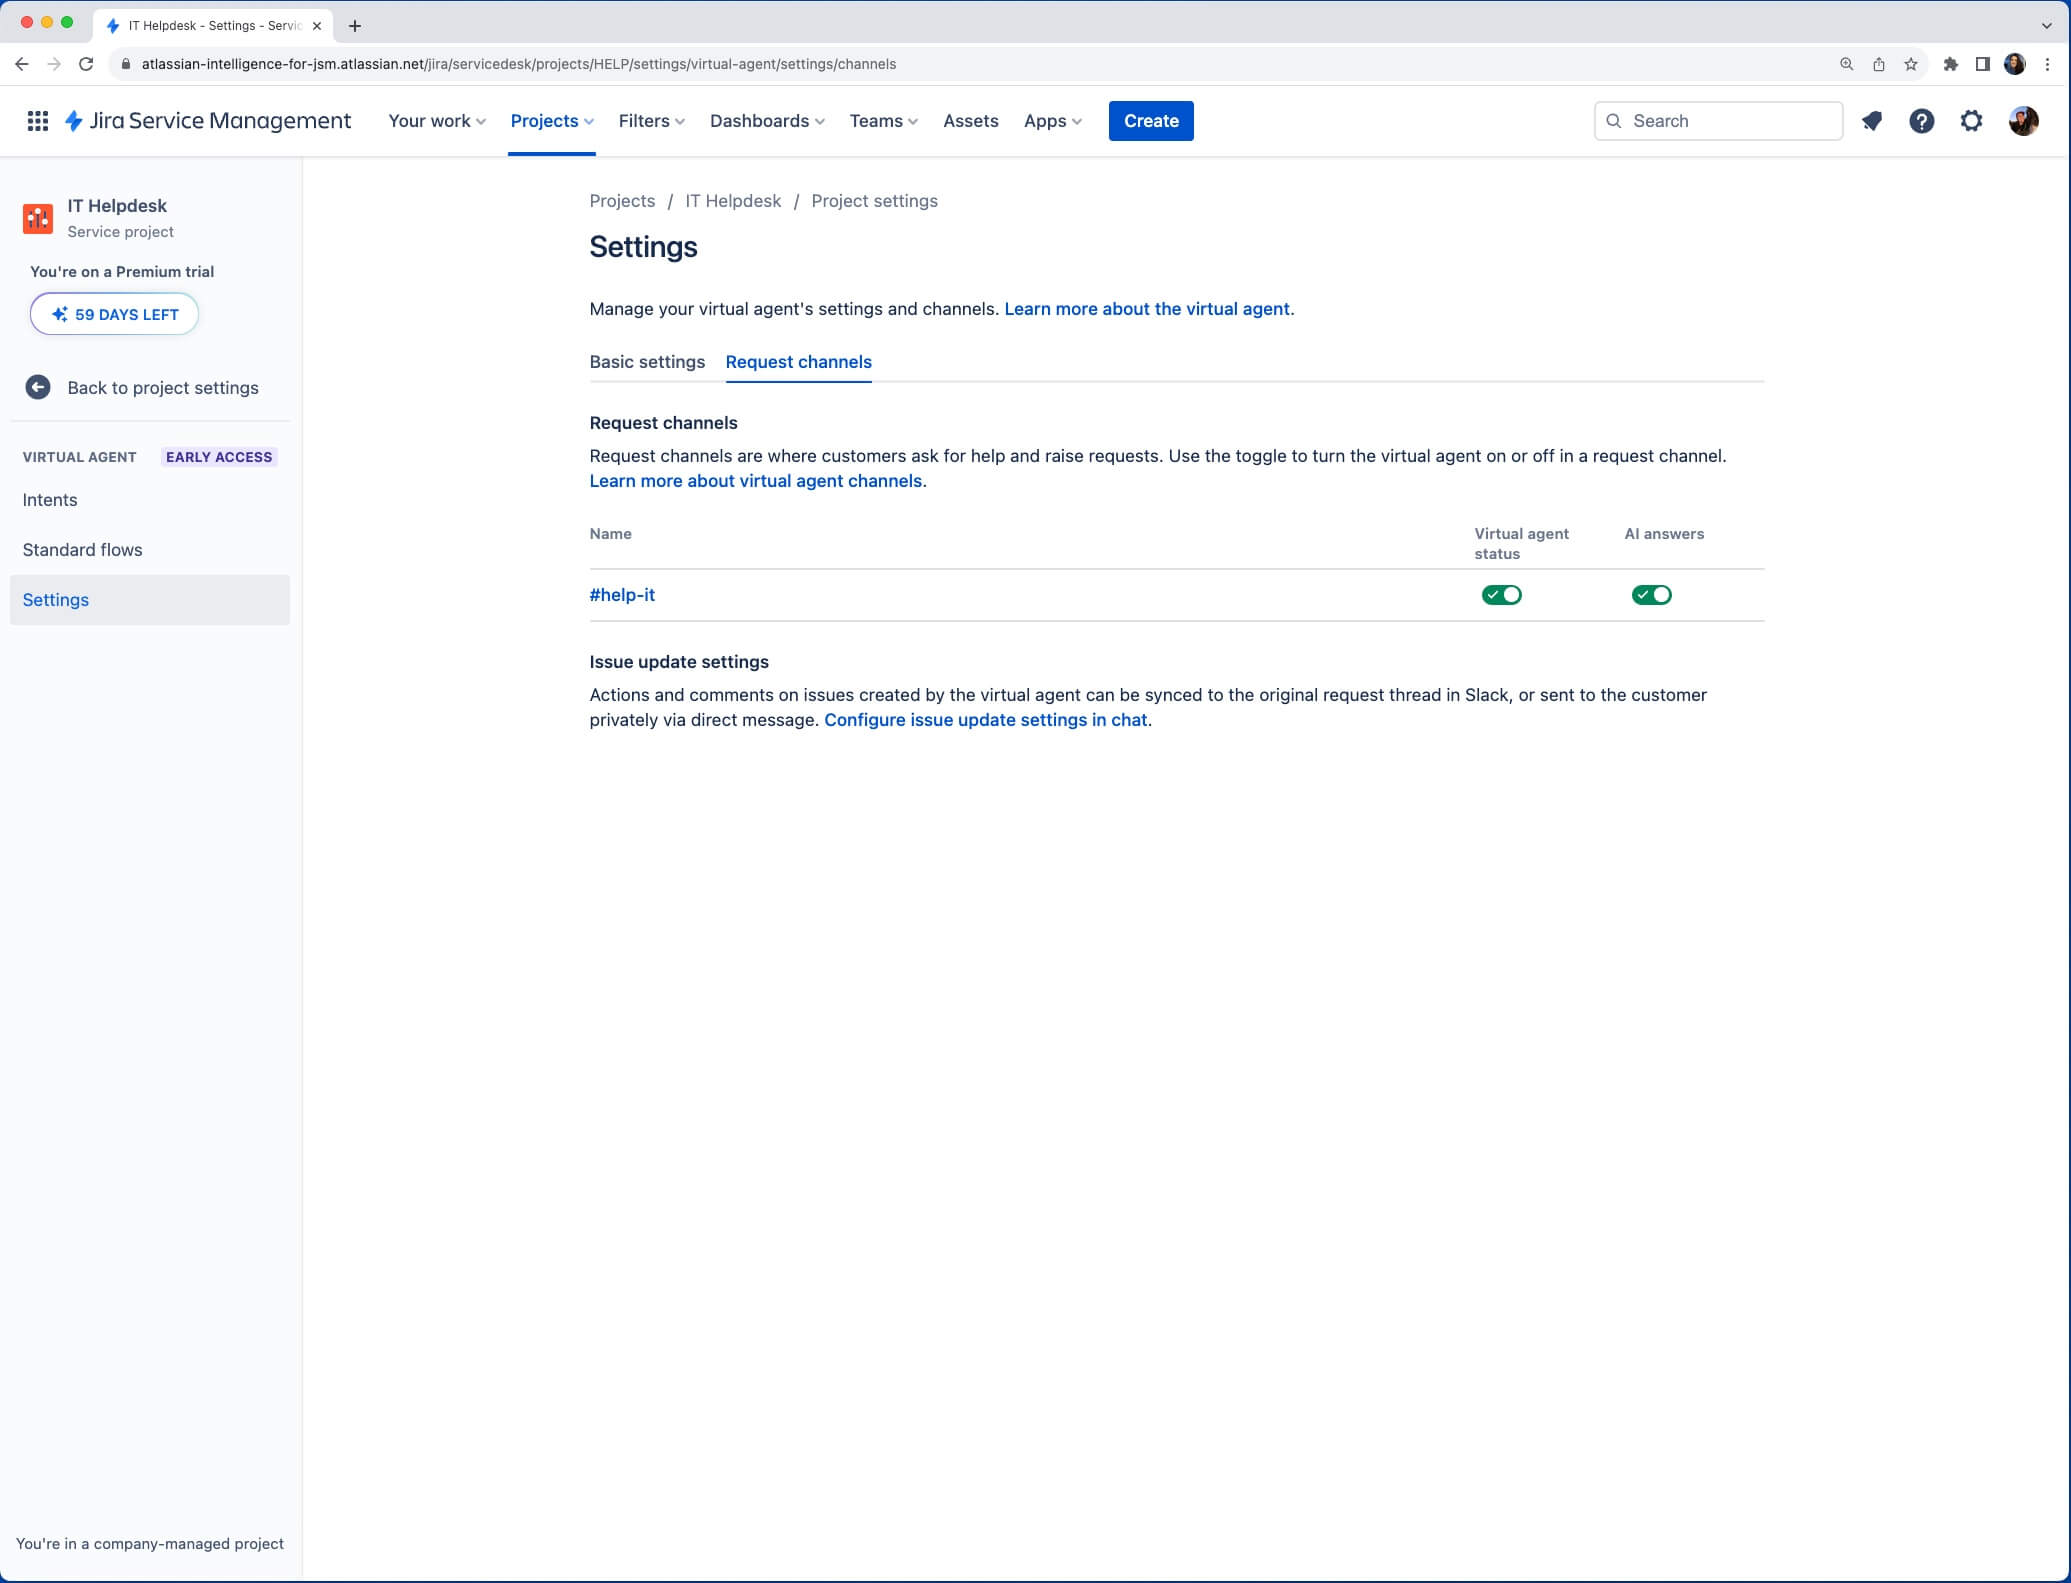
-
To turn on AI answers for your connected Slack channels, navigate to Request channels in Settings
-
Turn the toggle on under AI answers next to the request channel you want to activate it for, and then select Activate.
As is the case with all things in AI, the quality and accuracy of AI answers responses depends on the quality and accuracy of your knowledge base. The more up to date, well-structured, and clear your knowledge base is, the more questions you’ll be able to deflect with the virtual service agent.
Pro tip: Optimize your knowledge base to improve AI answer quality
Here are a few ways you can ensure your knowledge base is setup for success:
- Keep everything up to date: The most common reason for AI answers providing incorrect answers is because the source information is incorrect. Go through each article in your linked space and make sure everything is accurate and up to date. Remove vague, conflicting, or outdated information. Set reminders to check your knowledge base for accuracy every once in a while.
- Avoid duplication: Keeping your knowledge base space up to date is easier if you only have one article for each topic. For example, you don’t want to have two (or more) articles that walk through the same troubleshooting instructions, because if those instructions change, you’ll have to go and find all of the articles and update each one separately. If you need to include instructions from one article in another one, try linking to the source instead of duplicating the information.
- Include words and phrases that your customers use: When writing or updating your articles, make sure they contain words and phrases that are most likely to be used by your customers when searching. For example, your customers are unlikely to type “request new hardware” when looking for help – they’re more likely to type something like “I need a new laptop” or “I need a new keyboard”.
Launching your virtual service agent
Once you’ve configured your intents and/or connected your knowledge base, you’re ready to launch your virtual service agent out into the wild in just a couple short steps.
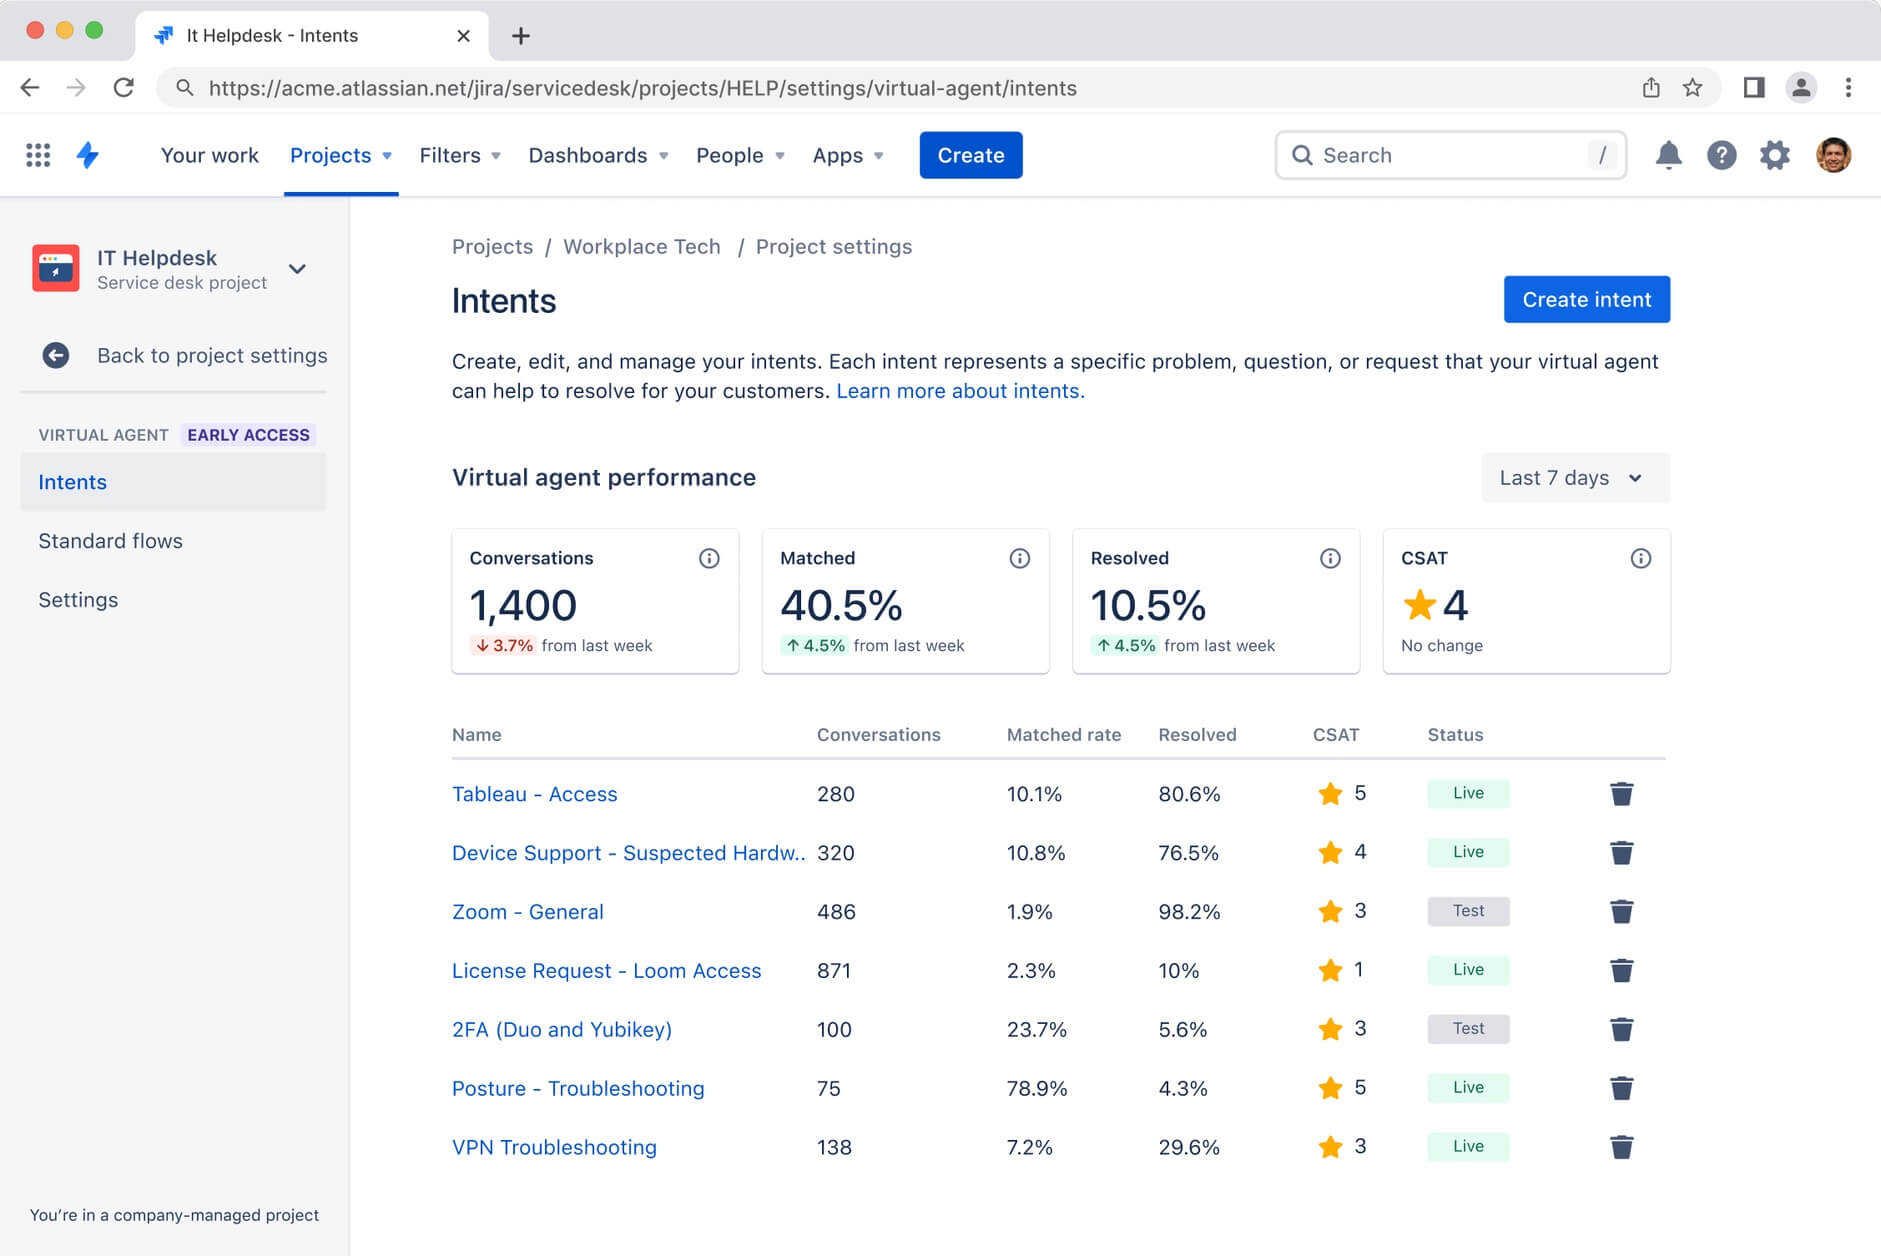
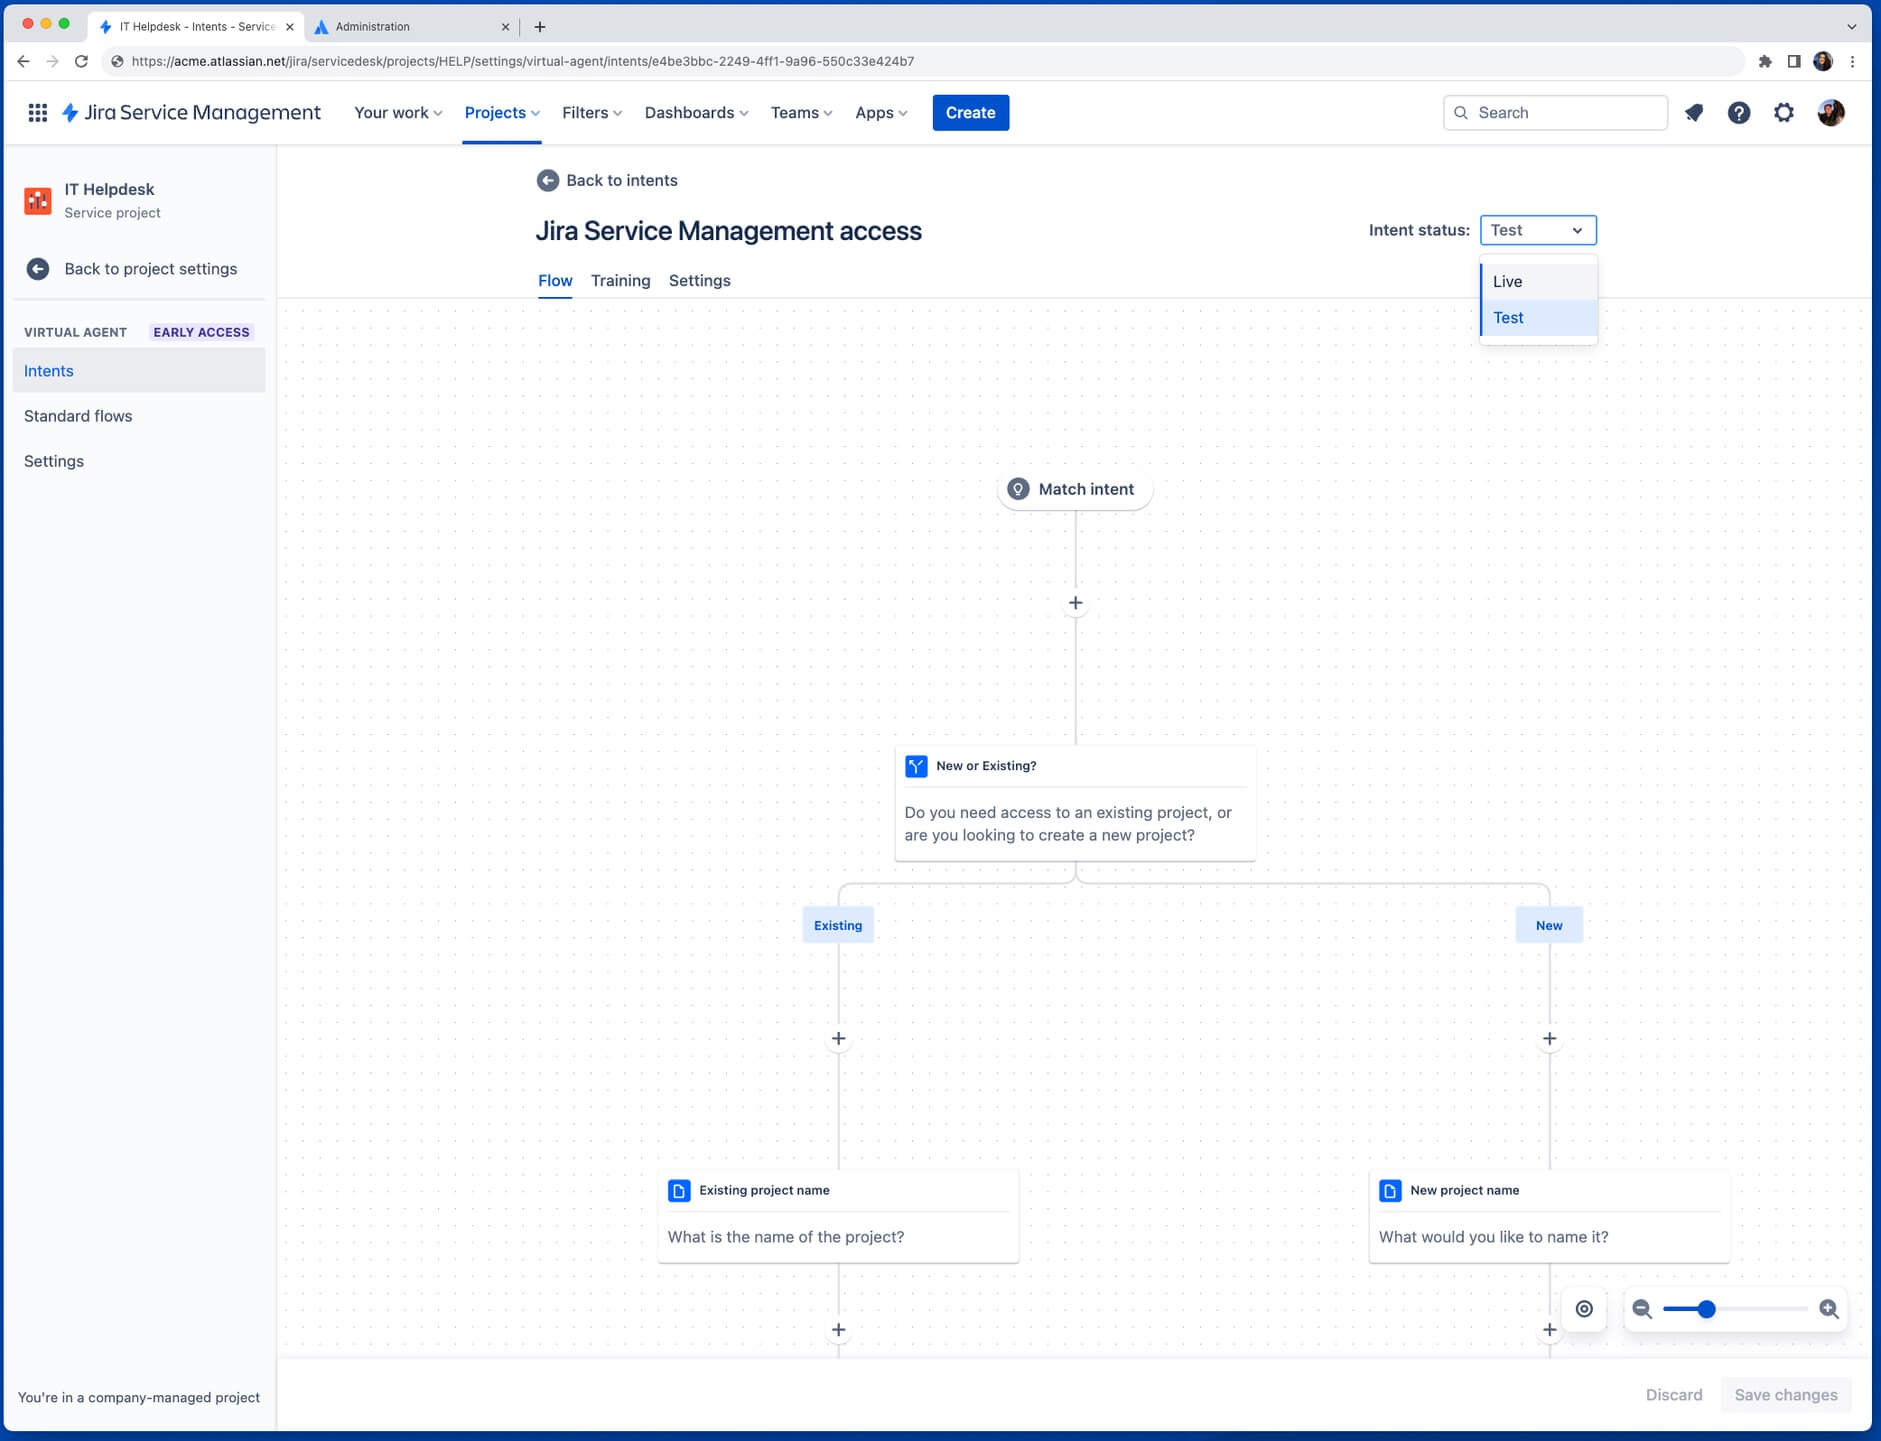
Intents can have one of two statuses:
- Test – the intent is active in the test channel, but not in the customer-facing request channel.
- Live – the intent is active in both the customer-facing request channel and in the test channel.
When you create a new intent, its status is set to Test by default. When you’re ready to activate it for customers, you can change the status to Live, and if any point you need to turn it off, you can simply switch the status back to Test.
Pro tip: Take your virtual service agent for a quick test drive
You can test your virtual service agent using the Test option in your virtual service agent settings menu on the left-hand side. This allows you to check training phrase quality, conversation flows, and Atlassian Intelligence answer quality in a testing environment before activating them for customers.
All intents will work in test mode by default, regardless of their intent status, and AI answers will automatically work in test mode regardless of if you have activated AI answers in your virtual service agent settings.
Best practices for testing conversation flows
- Get as many people as you can to help you test and give feedback.
- Try and use every available branch.
- Get everyone to imagine they’re in different states of mind: in a rush, stressed about an upcoming presentation, or have difficult personal circumstances.
- Test your “edge cases” (unusual or highly specific problems and requests) and see what happens.
- Ask for help in as many different ways as you can to see if you need to update your training phrases.
Configuring customer-facing channels
Once you’ve completed the basic virtual service agent setup, AI answers (if enabled) along with any intent flows you’ve switched to “live” will automatically be live in your Jira Service Management customer portal. From there, you have the option to connect the virtual service agent to additional channels by navigating to Project settings > Virtual service agent > Settings > Channels.
Slack
If you aren’t currently using Atlassian Assist for the Jira Service Management chat feature, you'll need to install the app to set up the virtual service agent in Slack. You can do this in the Channels menu by selecting Configure, then Add to Slack. From there you can follow the prompts to add the app to your Slack workspace.
You’ll need to create several Slack channels (or use existing ones by inviting the Assist app to the channel):
- Agent channel: Private channel only accessible by agents and admins, and allows them to assign, triage, comment, and work on issues.
- Request channel(s): Customer-facing channel where help-seekers can engage with the virtual service agent to get help and create issues.
You can turn the virtual service agent on or off in a Slack request channel from your channel settings using the checkbox next to Virtual service agent.
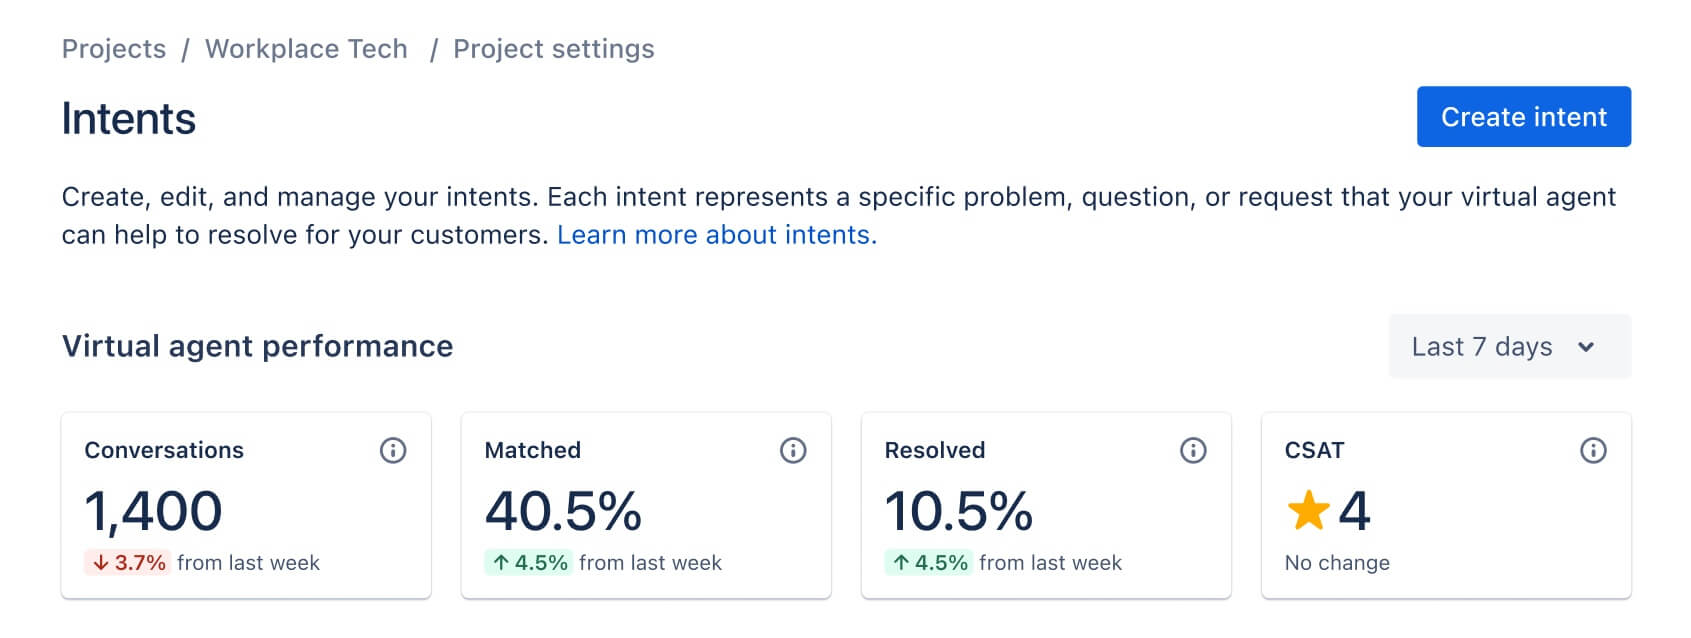
Measure virtual service agent value
Once your virtual service agent is live, it’s important to regularly check in on its performance to optimize your intent flows and AI answers. There are three main metrics the virtual service agent tracks directly, which can be seen in the Intents panel of your virtual service agent settings:
1. Resolution rate
The percentage of virtual service agent conversations that were resolved without any human interaction.
2. Matched rate
The percentage of conversations that were matched to any intent. These could be resolved or handed off to an agent for further support.
3. Customer satisfaction (CSAT)
A rating out of five about a customer’s interaction with the virtual service agent.
Want to give the virtual service agent a try?
Tips and tricks
Form design